
Chapter 1 - An Introduction
First off - if you’re here on your own volition, hoping to learn something or dig deeper into SMW hacking and level design, welcome! I truly hope you enjoy reading.
Second - If you’re here because some cheeky user on SMWC linked this to you while giving you a long winded lecture on all of your level’s flaws and how you need to improve - go ahead and close this doc, go back to your conversation, and tell that person to shut up. My sincerest hope is that this doc never becomes some sort of asset used in condescending lectures on how level design is “supposed” to be done. Game design is an art, not a science - there is no “supposed to be done” in this equation. In some ways, writing a guide on level design is paradoxical for me; when it comes to romhacking and amateur game design in general, I subscribe to the ancient philosophy of “who cares lol”. I truly believe that, as a hobbyist experience, the most important thing is for you to have fun doing it. There is no one correct way to make SMW levels, or to design any game for that matter.
That being said, I have always wanted to someday share the thoughts and philosophy on SMW level design that I’ve picked up over the years with others. Even though I truly believe that people should do whatever they want and whatever makes them happy, I also have my own set of beliefs and design ethos on what I think can help improve one’s level design abilities. These concepts aren’t in conflict - I can share what I think makes traditional levels interesting without outright telling you “you have to design traditional levels this way or else”. If it feels like I’m beating this point dead, it’s because it’s very important to me. As you read this, always remember that the most important thing you can do for yourself when romhacking is to enjoy yourself while doing it.
This isn’t a tutorial. A tutorial is meant to give you explicit instructions on how to do something. Rather, this is a sort of stream-of-consciousness collection on my thoughts on level design picked up throughout many years toiling away at this amusing and silly hobby. That said, a doc focused entirely on theory isn’t terribly useful, which is why I want to focus on real, actual tips and advice that you can actually use when designing levels in different styles - whether that’s traditional, creative, or full on Kaizo. A lot of level design guides in the past focused heavily on theoretical nonsense with quips like “always respect the player’s time” or “make sure your levels are challenging but fair”. But like, how are any of these mantras actually helpful? It’s very important to me that I share concrete, tangible things you can actually do when you work on levels, not just a bunch of fluff that sounds like a romhacking bumper sticker.
Another thing - learning how to make SMW levels well is a bit like learning how to make music on the guitar. Your ability to make levels is almost entirely based on two things: artistic ability and skill developed through practice. “Music theory” actually doesn’t really matter all that much. In fact, many talented songwriters and musicians never bothered to study or care about theory at all. Just because it isn’t necessary, doesn’t mean that it’s useless for you and I though - there are valuable lessons we can learn from studying the “theory side” of things from a game design perspective. Practice is something you’ll have to do yourself; likewise, artistic ability is something you’ll have to find within yourself. Then of course, I’m here to help share my thoughts and theory on design. You’ll need to do the rest though - all of these tips are completely useless without practicing them yourself, and the only way to do that is to get into the weeds - that’s right, boot up LM and make some levels! Once you practice more, you’ll naturally start to find your own artistic voice hidden within yourself as well. That said, it still all comes down to actually doing and practicing the thing that you want to improve at. I’ll be reusing the music analogy a few times throughout the doc, so I apologize in advance if you think it sucks.
Yes, this doc is pretty long, but that’s because there’s a lot to talk about. SMW level design has grown incredibly complex - it’s a topic that is deep and nuanced enough that it’s truly worth a big deep dive, in my opinion (especially since it’s never really been done before). If your attention span is short enough that reading all of this looks unbearable to get through, that’s totally okay - there’s no need to try to do it all. The different chapters should break down each relevant topic in detail. That being said, reading the entire thing front to back will give you a more complete picture of SMW level design in general.
One quick note - this "guide" only covers SMW as it relates to the platforming genre. This covers traditional hacks, straight up Kaizo, and everything in-between. If your hack primarily revolves around moving Mario around and performing platforming-based actions to progress, this guide should cover that. However, not every hack is like that; projects like Reverie, Isikoro's Sokoban Hack, and 'the completely change what SMW is about, turning SMW from a platformer into a meta-puzzle or a horror game. With enough ASM and determination, you could turn SMW into literally anything: a surreal horror game, a shoot-em-up gradius-style, or a chess simulator - you name it. Ultimately, however, this stuff is outside the scope of what I want to talk about. For one, I'd wager that 99% of SMW hacks still fall under the platforming genre. Second, I'm not exactly equipped to give you advice on this other stuff anyway - you could turn SMW into a turn-based RPG if you wanted, but I know literally nothing about what makes a "good RPG". And lastly, going way too in-depth on what SMW could be kind of misses the point I think. My goal is to share advice and tips on platformers; introducing other game genres would just make this guide way too long (longer than it already is!) and unfocused. I did want to bring this up though, since it is true that there are hacks that fall completely outside the scope of this doc. Ultimately, these hacks are still very rare novelties and require extensive work to re-program or re-design the game's basic mechanics into something entirely different. This guide also won't cover Pit hacks, since these are also far outside the scope of normal platforming-based level design.
Some required disclaimers:
- Everything in this doc is the author’s opinion. As stated above, there’s obviously no one “correct” way to hack this game.
- This doc assumes that you’re already well versed in LM and all of the other various SMW romhacking tools. This isn’t a romhacking tutorial.
- This doc also assumes that you have rudimentary knowledge of the SMW romhacking community and its meta, as well as of SMW itself. If you aren’t at least somewhat familiar with the concepts of Kaizo or Standard, or if you haven’t played at least a few SMW hacks before, you will most likely be hopelessly lost. This doc gets very deep into the weeds.
Chapter 2 - Super Mario World
Things didn’t start this way though. Before Lunar Magic and other romhacking tools came to be, before Pandora's box was shredded to pieces by the collective brilliance and craziness of our SMW community, there was just a simple 1990 video game: Super Mario World. It’s certainly not worth a huge discussion on this game - we’re all familiar with it by now, after all. That said, I still think it’s worth a quick section. Much of our collective SMW community jargon on level design is rooted in the context of the original game. When we subvert design expectations, we need to understand that we’re subverting the original SMW’s level design, not some other game. When we say traditional, classic level design - we mean Level Design Similar to SMW; after all, there’s plenty of other great platforms that are absolutely nothing like SMW. When we talk about creativity, we mean things that are creative in the context of SMW as we know it. Even as some of us move far past the original game’s style of design, we can never really escape the DNA etched permanently into stone by Tezuka and his team.
Super Mario World is a platforming game that, at its core, is about making the small plumber man jump from platform to platform while dodging enemies. Mario has the freedom to approach obstacles more or less as he chooses, and while there are moments of “purposeful creative design”, most of the action comes from fairly standard Nintendo style platforming and dodging enemies. In my opinion, there are a few key facets of SMW that are worth mentioning that make it unique from other Mario games, however:
- A platformer can consist of 3 different elements of gameplay: Action, Puzzle, and Platforming. In my opinion, SMW is probably around 70% platforming, 30% action (especially compared to YI, which leans much heavier into action). SMB1-3 are somewhat similar in this regard. SMW obviously has extremely little in the way of puzzles (unless you count Star World 3 as a puzzle), though its engine has become the perfect puzzle sandbox in the romhacking world.
- SMW encourages exploration (via secret exits, split paths, and larger stage layouts) without diving fully into true exploration (like YI and SM64 would later). Each stage still has a clear goal to move from Point A -> Point B, though the introduction of dragon coins adds an extremely light and fully optional collectathon element.
- Similar to the previous point, SMW contains a stronger degree of nonlinearity and player-freedom in its stage layouts compared to earlier games in the franchise (SMB 1 - 3). SMW features less of the extremely streamlined and concentrated platforming challenges seen in SMB1 and SMB3. Instead, a bit of the concise platforming is sacrificed to allow for players to decide how to approach things with a greater degree of freedom than seen in previous titles. Despite this, Nintendo never allows for a challenge to be completely invalidated, and it’s clear that the developer made some decisions to ensure that trivializing entire sections wasn’t too easy (i.e. the difficulty of mastering cape flight for beginners, the timer on winged Yoshi flight).
If you’re here reading this, most of the above was probably already obvious to you. Hopefully this crash course on the original SMW wasn’t completely useless for you in that case. I do think it’s important to remind ourselves what the original game is like so that we can better appreciate the various design styles seen in the romhacking community, which we’ll also dive into throughout this doc. Whether we’re trying to subvert people’s expectations of the original game (Creative / Kaizo design) or seeking direct inspiration from it (Traditional design), everything we do is still framed in the context of the game we are modding, after all.
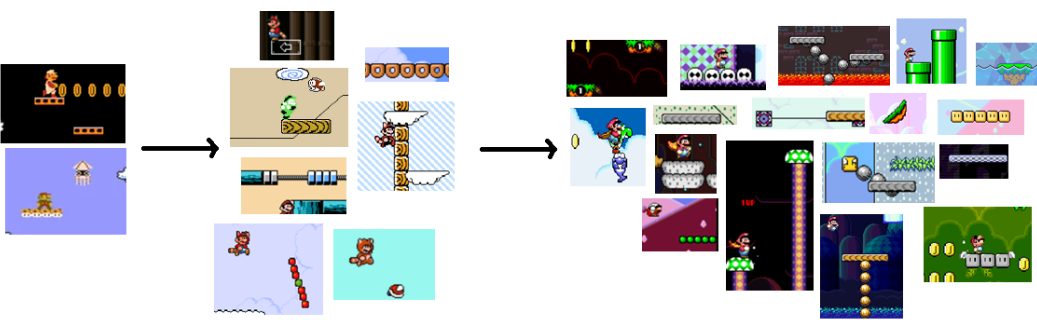
Chapter 3 - Level Design Styles
Note: Before we begin, this section gets pretty heavy into theoretical nonsense. If you want to skip straight to the actual advice, go ahead and skip to the next chapters. However, note that the next chapters will borrow from and reference terminology that is explained in this chapter.
I don’t want to spend too much time on theory, mainly because theory is useless without being coupled with actual concrete, practical tips and advice. That being said, it wouldn’t make much sense to dive straight into advice for different design styles without first going over what those design styles actually are. But like, why even split this up based on design style? Shouldn’t good level advice cover any type of SMW level you make? After all, Axemjinx’s classic level design guide from all the way back in 2011 was designed to cover any type of level.
Things have changed a lot since 2011 though, back when the predominant level design style on SMWC was standard (and specifically traditional standard). Nowadays, a one-size fits all approach doesn’t make much sense. In fact, many of the game design principles you’ll find floating around online, principles that are often touted as “one size fits all” advice, are actually not at all. Introducing your gimmick in a safe area? Great to do in standard, where death is more meaningful and a larger percentage of time is spent deeper in the level. But in a Kaizo level, where you’ll be dying constantly (with instant retry), resulting in the very first setup being the most-repeated obstacle by far, it’s actually detrimental to the stage’s flow to make your very first screen an overly safe (and thus dull) introductory obstacle. Not to mention the fact that being able to instantly restart the level via quick retry invalidates the need to introduce the gimmick safely in the first place. There’s many other examples I can list, but in summary - different level styles have fairly distinct approaches to obstacle design - so much so that “general” advice often doesn’t really work across each style. We’ll need a healthy dose of nuance if we want to truly dive deep into this.
Back during Axemjinx's days, it was commonly perceived in most parts of the SMW community that there were two “styles” of level design: traditional (i.e., similar in style to the original SMW) and non-traditional (i.e., not at all like SMW). Imagine Super Demo World vs. Cool|Cruel, The Essence Star vs. Super Puzzle World, etc. As time went on, however, many people realized that this was a vast oversimplification of the many many different styles of level design.
Eventually, as Kaizo came to be seen as a legitimate art form and not muncher-filled youtube levels for protonjon to play (those levels are still art by the way), the community shifted towards the categories of Standard and Kaizo. These are currently the two most universally accepted types of design styles in the SMW community, so those should be the categories we discuss, right? Not exactly - things aren’t quite this black and white. For one, the term “Standard” as it relates to SMWC specifically just means anything that isn’t Kaizo. It’s really just a catch-all term for hacks that don’t fall under Kaizo, not a design style. Mice, A Plumber for All Seasons, and 'the are all filed under the same category of “Standard”, despite all of these hacks having almost nothing in common. The only real unifying force between them all is that they aren’t Kaizo. This definition works fine on SMWC when trying to browse the section for hacks to play, but we’re trying to drill deep into the nuances of level design styles - we can do much better.
In general, this document won't use the word "Standard" much as it refers to level design. Ultimately, this is because, as described above, Standard is not a genre of platformer - it's a category on SMWC to indicate that something isn't Kaizo. It's more useful to talk about different styles of platforming as they truly are - our understanding should be based on level design theory as it applies to platforming; we can't be restricted by the categories on SMWC. It's good to get in the habit of no longer thinking of Standard as a specific level design style. When you do this, you start to realize that there's a lot more nuance to everything.
Things get even more complex when we realize that our design style section need to cover design at the obstacle level as well, not just in relation to entire levels or hacks. For this, we need to drill pretty deep into things. Buckle up - this section is gonna get a little jargon-heavy, but I'm going to do my best to hopefully make this section not too much of a mess.
Chapter 3, Section A: A Deep Dive Into Game Design Freedom
Trying to come up with a way to categorize all of the styles of SMW levels, or platformers in general for that matter, was a rather difficult task. For one, we want to make sure that we're inclusive enough that we consider any type of level. Additionally, we don't want to be too prescriptive - we're trying to better understand the genre of platforming, not put level design styles into boxes. Lastly, the way that we measure this needs to be intuitive and, most of all, actually helpful; we don't gain anything from overly verbose and pedantic theory.
After giving it some thought, and getting some help and input from Lazy and MiracleWater, we came up with something that I believe (and hope) is highly inclusive, while still being fairly intuitive and helpful. Before we can start though, we'll need a brief overview of the difference between micro-design and macro-design.
Micro vs Macro Design
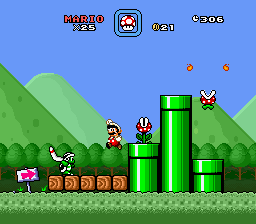
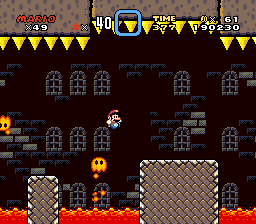
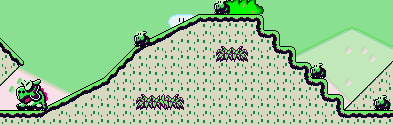
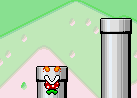
Levels are primarily composed of a series of obstacles - you didn't need to read this guide to know that. What exactly is an obstacle though, and how is it different from a setup? While we sometimes use these terms interchangeably in the SMW community, in my mind, an obstacle is a single unit of "challenge" in its most basic form. For instance, the below level contains an obstacle in which you jump over a lava pit while avoiding a podoboo. Conversely, a "setup" is often used to refer to an obstacle, or a single unit of challenge, that happens to be precisely engineered to function in a way that the author intends. In other words, you are "setting up" the obstacle to work. Obstacles in Kaizo levels are often referred to as setups, as well as in puzzles levels. In other words, all setups are obstacles, but not all obstacles are setups. In fact, it would seem rather silly to call the below obstacle a setup - nothing is really being "set up", it simply exists. It's not a super important distinction, but for the rest of this section, I'll generally be using the word obstacle, since it's more inclusive towards all types of design. I may switch to using the word setup in later sections that cover more highly engineered styles of design.
Individual obstacles exist at a micro-level - there are usually tons of obstacles in a level. Additionally, all levels have an "essence" that emerges at the macro-level; this represents the overall structure and feel of the level in holistic terms. Macro-level design is often more abstract and is closely related to the level's architecture, layout, themes, gimmick, and other factors that affect gameplay holistically.
Here is our first major curve ball - the design style of the obstacles (at a micro level) and the design style of the level itself (at a macro level) are functionally independent. Now, not every level will use these concepts independently. For the most part, these concepts work in tandem; however, there are often situations where these concepts accomplish completely different goals. For instance, let's look at the puzzle level Maw of the Beast. Mario has plenty of freedom to move around, even more so than a big expansive SMW level like Vanilla Secret 1. You can pretty much go wherever within the level. However, in order to solve and finish the level, you must perform each of the obstacles exactly as intended. While there is no intended route at the macro-level, you cannot deviate from the intended solutions to the obstacles at a micro-level whatsoever. In essence, this makes the level fairly nonlinear at a macro-level; however, the individual obstacles are almost Kaizo-esque in that they need to be performed exactly as the author intends. How on earth do we categorize a level like this? The primarily accepted definitions of Standard and Kaizo don't work at all here, and it would be incredibly silly to call this a "hybrid" level between the two. Instead, to better understand this, we need to introduce our next key concepts: linearity, player freedom, and author control.
Macro (Level) Design - Linear vs. Nonlinear
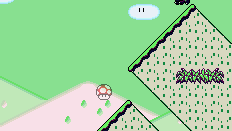
Let's discuss linearity vs nonlinearity first, since these concepts are fairly intuitive and already commonly discussed in conversations about level design. As I previously mentioned, the scale of linearity occurs at the macro (stage) level - this is primarily determined by the architecture of the stage. Essentially, a linear level has a fairly railroaded, straightforward path through the level, while a nonlinear level gives the player options and many different paths in how to solve the level. This has absolutely nothing to do with the design of each individual obstacle, and everything to do with how much freedom you are given to tackle different obstacles.
In essence, linearity/nonlinearity a function of freedom and player agency as it relates to when you will tackle the obstacles (i.e. in which order you tackle the obstacles), and in some cases (as shown in the left level above where there are multiple paths), which obstacles you will tackle.
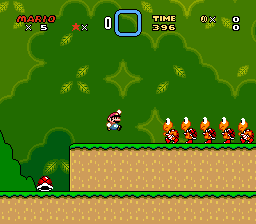
Here is curve ball number two - nonlinearity is the degree in which you have freedom to tackle obstacles in a different order, or which obstacles you want to tackle at all. Levels where you can move around freely, but you still need to perform every obstacle in an exact order, are still considered linear. For instance, let's look at the puzzle level Maw of the Beast. Mario has plenty of freedom to move around, even more so than a big expansive SMW level like Vanilla Secret 1. You can pretty much go wherever within the level. However, in order to solve and finish the level, you must perform each of the obstacles in the exact order required. While there is a degree of nonlinearity present within the information-gathering stage, since you can move around freely and observe the environment, solving the puzzle requires playing each of the obstacles in a highly linear fashion. Here's a good litmus test - if 20 people played a level and their clear video follows essentially the exact same route through the level, it's probably a linear level. Another way of thinking about it - if you played the level 5 more times, would each of your playthroughs look mostly the same / take the same route through the level, or would they be different. If you played EXPANSIVE COURSE 5 times, each playthrough might take a completely different route, whereas you'll probably play Maw of the Beast the exact same way all 5 times.
So what are the benefits of linearity and nonlinearity? Well, linearity allows us to streamline the level's route, which is obviously highly useful for certain types of design (puzzles, Kaizo, or any level where we want the obstacles completed in an exact order). In the realm of traditional levels, linearity allows you to present a more streamlined series of obstacles, which can allow you to craft a more specific experience for the player. Since players will be following an exact route, we can also better predict how players will move throughout the level. You can use this to better time enemy placements as well, since players will almost always approach the enemy from the same location. Notice how the above level to the right (HURDLING COURSE) has more specific challenges, while the level to the left (EXPANSIVE COURSE) mostly has enemies that are simply placed on the ground to be dodged? We'll get into this a bit in chapter 4, but this linearity allows us to craft more specific challenge types. There's a tradeoff happening here - as we introduce nonlinearity and give players agency to tackle whichever obstacles they please in whatever order they please, the challenges often need to be a bit less complex than if we were playing a linear level.
On the other side, nonlinearity is a valuable tool for providing players with a feeling of significant player agency. This can aid in replayability - you may play the level again and experience it in a completely different way. Nonlinearity is closely related to exploration, and we'll go over that in more detail in chapter 4 as well.
(Micro) Obstacle Design - Player Freedom vs. Author Control
Now that we've covered linearity and nonlinearity at the macro level, we need to dive into the scale of freedom at the micro (obstacle) level. Player freedom is the degree to which the way the player completes an obstacle can deviate from the way the author “intends” the obstacle to be played. Another way of thinking about this, however, is where the decision making power rests - within the hands of the player, or the creator. If we think about it in terms of Kaizo obstacles, it makes things pretty clear. In a Kaizo obstacle, or setup, the decision making power lies with the creator - the author of the level is able to exercise their creativity, or evilness, or whatever, to the fullest extent. On the flipside, the player is at the mercy of the author. In terms of difficulty, yes. But also in terms of decision making. The Kaizo obstacle must be played exactly as the author intends with zero deviation. Another way of thinking about this, however, is that the obstacle has a low degree of player freedom and a high degree of author control.
Now let’s look at a level with more "traditional" obstacles: Pipes in Literally Everyone's Business from JUMP. As you watch the level, notice how the player has many different choices they can make in how to tackle the obstacles. Growing pipe with parakoopas above it? You can wait a bit and carefully maneuver around it, or simply charge through it with a fireflower and burn the koopa. Nowhere does the author of the level attempt to force the obstacle to be played in a certain way. The obstacle simply exists, and it’s up to the player to decide how they will clear it. This concept, that obstacles simply exist and can be tackled in any way that the player chooses, is often the case with obstacles in traditional levels (though not always).
This example isn’t quite nuanced enough for us to really dive into this though. It’s pretty easy and traditional, which makes it very very different from a Kaizo level. Let’s bring in another level: A Light(ning) Storm, a 24hr contest entry by MiracleWater. The gimmick of the stage is simple in concept, yet devilishly tricky in execution: every few seconds, lightning flashes and electrocutes metal (such as the key that you need to bring with you throughout the stage). When lightning flashes, you need to make sure that you aren’t still holding onto the key.
This level is quite difficult, harder than many Kaizo levels. However, this level is quite nonlinear in terms of gameplay. There is a large degree of freedom present in the design that makes it impossible to play this level like a Kaizo hack. But why? And how can it be insanely difficult and fairly linear, but not be Kaizo at all? For one, most of the obstacles are particularly difficult to learn through muscle memory, which is achieved through the use of accumulating design variables to increase complexity. The level introduces several variables at once that require the player to make decisions on the fly, rather than “learn and execute”. The central gimmick is highly decision-based and requires significant on-the-fly parsing: players need to decide when to throw up the key and avoid dying while holding it. This results in two other decision making variables - where you are when you throw the key and where the key will land based on the trajectory of the throw. Depending on both variables, a section of the level can be trivial or incredibly hard. The point is that this decision rests with you, the player. Combined with this is the fact that the obstacles in the level are extremely action based, and you have obstacles that actively prey on players that are used to relying on muscle memory - the utter antithesis of Kaizo-styled design.
Not to get too off topic, but let’s dive into that briefly. Why are the obstacles in this level action-based, while your average Kaizo level wouldn’t be? The reason is because obstacles in ‘A Light(ning) Storm’ trend towards chaos, rather than predictable patterns. Baseball chucks are common in the level and are combined with moving platforms - two variables that encourage chaotic design, as the sprites slowly become out of sync. While an old level design tutorial from years past might say that this is textbook bad design, we now understand that this is not the case whatsoever. Rather, the chaotic level design and chaotic gimmick allow for obstacles that put tremendous decision-making power in the hands of the player. In fact, this decision-making is used not only to enhance the design, but to enhance the difficulty. Unlike ‘Pipes in Literally Everyone’s Business’, where player freedom makes the level easier, A Light(ning) Storm gives players freedom to make them feel tremendously challenged. Because players must rely greatly on decision making, this means (in turn) that they can rely very little on muscle memory. As we can see, player freedom is an incredible tool that can allow you to achieve many different goals in obstacle design that can’t be accomplished otherwise. We'll go over the nuances of traditional obstacle design in detail within chapter 4, diving deeper into how making an engaging traditional obstacle is achieved.
Let's talk briefly about the benefits of restricting player freedom. While I'll discuss this very in-depth in chapter 5, I think it's worth mentioning here since we already covered the possible benefits of obstacles that allow for player freedom. Restricting player freedom is a tradeoff - the trade is that, as the player sacrifices their freedom to tackle an obstacle the way they want, they are entrusting you, the author, with providing a "cool" obstacle. Author control is a tool that can be used in a ton of different ways, but in essence, it allows you to mold a highly specific experience for the player.
At the most basic and obvious level, author control is utilized almost universally in Kaizo. The way a Kaizo level is played is through repetition and learning. In most Kaizo levels, the obstacle remains the same on each playthrough (with very little or no RNG). This, combined with the typical use of retry, means the player will constantly be playing the same obstacles over and over, bettering themselves each time. In a sort of cathartic ebb and flow of constant progress (much in the same way one might knit or something), the level is slowly “grinded out” and beaten. Unlike A Light(ning) Storm shown above, there are very few fly-by decisions made during the course of the level - for the most part though, it’s simply a matter of doing what you’re told by the author (or in some cases, figuring out what the author wants) and then repeatedly executing until you’ve mastered the setup. This can be deeply satisfying in a number of ways that we'll dive into in detail in later chapters.
Outside of the realm of Kaizo, author control allows us to achieve a few unique goals for an obstacle's design: satisfying flow of continuous movement, clever and unconventional ideas, novel and emergent enemy interactions, playful and humorous moments, and even straight up puzzles. All of this is possible by restricting player freedom and forcing the player to play the obstacle the way you intend, and we'll discuss all of this in detail in chapter 5.
Plotting The Freedom Chart
At this point, you should have a pretty good understanding of design at the macro level (linearity vs. nonlinearity) and design at the micro level (player freedom obstacles vs. author control obstacles). If you think about it, we should in theory be able to plot a multitude of levels along a theoretical graph based on these concepts. I decided to take a quick stab at it:
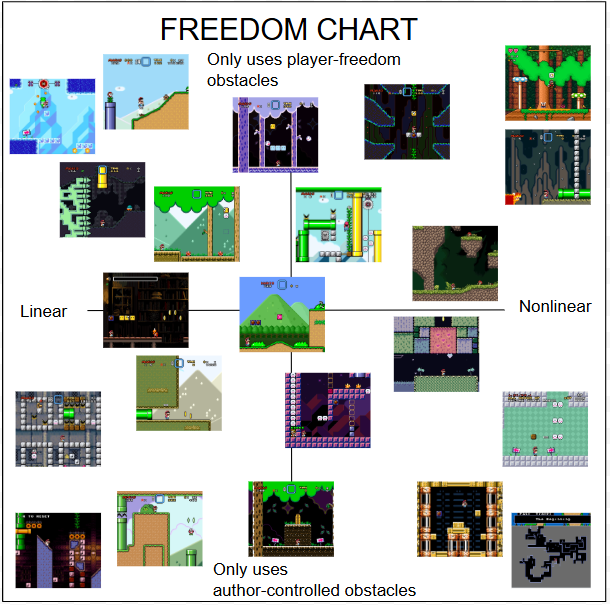
For the chart above, I chose a bunch of random levels and attempted to plot them based on two factors: the macro-structure of the level (linear vs nonlinear), and the degree to which obstacles in the level tend towards player freedom or author control. Since these two concepts are independent, a level can theoretically sit anywhere on the chart. Before we dive deeper into this, however, there's another thing we can do to this chart to help tie everything together.
To help illustrate how this relates to the common vernacular within the SMW community, as well as SMWC's own hack categories, I separated sections of the graph based on the categories of "Traditional", "Kaizo", and "Hybrid". As we can see, these categories are fully dependent on where the level sits on the Y axis, which is entirely related to whether the obstacles tend towards player freedom or author control. Linearity and nonlinearity at a macro scale has no bearing on whether a level is considered traditional or Kaizo. We'll illustrate this point in greater detail when we look at examples, but just as a brief aside, think of it this way - if a level gives you two paths to take at the start (left or right), both lead to the same goal, and both paths are fully Kaizo, the level itself is certainly Kaizo, is it not? Ultimately, the degree of freedom present within the obstacles themselves dictate whether a level falls into one of these particular categories.
To help illustrate how this relates to the common vernacular within the SMW community, as well as SMWC's own hack categories, I separated sections of the graph based on the categories of "Traditional", "Kaizo", and "Hybrid". As we can see, these categories are fully dependent on where the level sits on the Y axis, which is entirely related to whether the obstacles tend towards player freedom or author control. Linearity and nonlinearity at a macro scale has no bearing on whether a level is considered traditional or Kaizo. We'll illustrate this point in greater detail when we look at examples, but just as a brief aside, think of it this way - if a level gives you two paths to take at the start (left or right), both lead to the same goal, and both paths are fully Kaizo, the level itself is certainly Kaizo, is it not? Ultimately, the degree of freedom present within the obstacles themselves dictate whether a level falls into one of these particular categories.
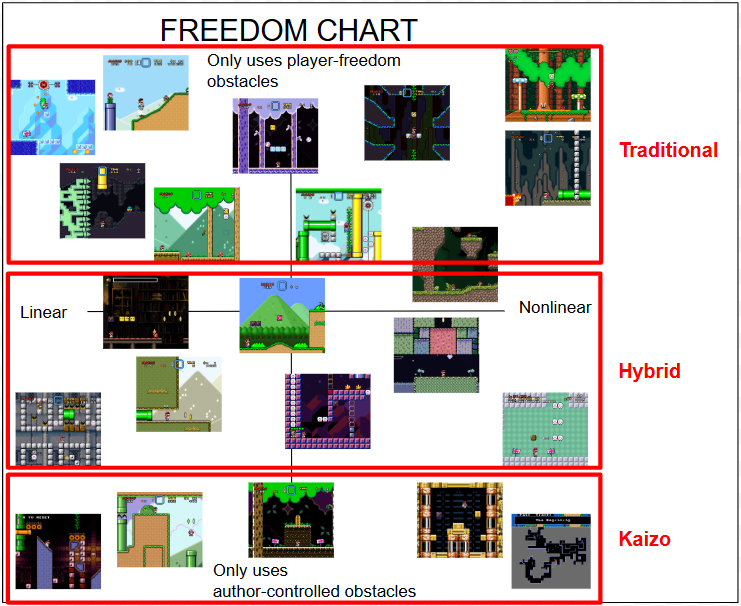
At the top of the chart, we have traditional levels. Traditional levels, as it relates to this guide, are levels that primarily features obstacles with mechanical requirements that don't stray far from the original game. If we think about it though, this means the exact same thing as saying that an obstacle features strong player freedom. The original SMW's obstacles can all be tackled in numerous different ways; ultimately, the decisions you make when approaching an enemy could include killing it, jumping over it, flying over it, shooting it with fireballs, or a number of other things. Perhaps you can simply go under the enemy if it's sitting on a ledge, or you can ignore it outright if you approach the obstacle from a higher ledge. The point is, the original SMW's core obstacle design features significant player freedom and extremely little author control. As such, when we see romhacks levels that are also heavy on player freedom with very little restrictions on decision making, we call these levels traditional. The meaning of the word "traditional" is completely dependent on the game we're modding. If we were modding Celeste, "traditional" Celeste design would look much closer to an SMW Kaizo level, since the original Celeste's design is far more heavy on author control. We'll go over traditional design in far greater detail in the next chapter.
At the bottom of the chart, we have Kaizo levels. Based on everything I've already discussed, this should have already been obvious to you - Kaizo levels restrict player freedom more than any type of level. Here's an interesting and potentially non-obvious thought - Kaizo levels are not inherently difficult, but within a Kaizo level, player freedom is restricted to such a high degree that the obstacles become difficult as a natural byproduct.
Let's think about it this way - you're driving a bus in a big open field in the desert (haha); while there's some cows and cactus that may get in the way, you can drive pretty much anywhere. Nothing is particularly challenging yet, but you still need to pay attention to make sure you don't hit anything. Now, imagine that cones have been placed down in a winding path that you have to drive through - if you knock down a single cone, you're in trouble. Suddenly, this exercise has gotten significantly more difficult - the freedom you had before has been severely restricted, and the imaginary person that designed this obstacle course of cones, with its twists and turns, has a much higher degree of "control" over whether you will fail or succeeed. There's no potholes or incoming cars or giant spaceships trying to shoot your bus down with a laser. You're doing the exact same thing you did before with the same obstacles; this time, however, freedom has been restricted. There are fewer ways to drive the car now that won't result in failure - in other words, there are significantly fewer "potential paths of success". This is exactly how a Kaizo level works.
As an aside, let's think about our analogy again as it relates to traditional levels. If we greatly increase the number of cows and cactus scattered about the field, but you're still allowed to drive everywhere, things have suddenly gotten more difficult. What if the cows now moved at incomprehensible breakneak speed, making them much harder to dodge? You aren't nearly as restricted as you were before with the obstacle course of cones, but there is no question that it will be more challenging to drive around. This is exactly why traditional levels can be harder than Kaizo levels, without actually becoming Kaizo. Think of it this way - your hardest traditional hacks (hacks that often fall under the Standard: Expert / Master categories on SMWC), don't make obstacle courses out of cones, they simply make the cows and cactus harder to dodge.
Finally, let's talk about the category in the middle of the chart - hybrid levels. I'm not a huge fan of the term hybrid as it relates to SMW level design, but nevertheless, I can't think of a more appropriate words to describe these types of levels. Levels in this category feature design that straddles the boundaries between player freedom and author control. For many of these levels, it's simply a matter of shifting between obstacles that feature heavier player freedom and lighter player freedom - in essence, the ration of player freedom obstacles and author control obstacles is closer to 50-50. In other cases, the level may primarily feature obstacles themselves that sit on the boundary between player freedom and author control.
In this day and age, "hybrid" level design has become trendy - a sort of design dichotomy that level designers up to date on the meta should strive towards. Personally, I don't buy that at all. There's nothing wrong with hybrid levels; some of the hybrid levels I added to the chart above are my own levels, after all. In my opinion, however, there is no type of level better than any other type. Rather, the most important thing you can do for yourself is grow stronger at creating the types of levels you yourself want to make.
Chapter 4 - Traditional Design
Calling something traditional on paper sounds a bit boring - the wide range of modern tools at our disposal can let us turn the SMW engine into so many different things. With enough hard work and ASM, you can turn SMW into literally any game you want. Why would you want to make something similar to the original SMW, or something Nintendo themselves might make?
Well, besides the fact that maybe you simply want to because you feel like it (incredibly based), there’s a lot of nice benefits to traditional design. SMW is a platforming game at its heart, and many consider the physics to be among the best of any platformer. SMW features tons of great enemies and wonderful features - enough that Nintendo managed to make 74 levels that all feel fairly unique from each other (and we’ll explain how they did that in the next section). Mario’s moveset in SMW is actually very versatile, especially compared to SMB1-3: there’s regular jumping, spinjumping, climbing, swimming, sliding, Yoshi, cape physics, and plenty of cool ways to use all of them. The possibilities are almost endless, and when you throw in unique non-vanilla enemy combinations and other ASM not seen in the original, you have a recipe for truly creating something totally unique from the original game, while still carrying the same general vibe and design style. On top of this - SMW isn’t exactly known for being incredibly difficult. By creating a traditional, Nintendo-esque hack, but ramping up the difficulty, you’re letting players enjoy what they loved about SMW again - but maybe this time with an extra added challenge (something that is welcome for experienced SMW enthusiasts). Traditional can be a wonderful way to discover and celebrate just what made the original SMW great. Why change the formula too much if it worked so well with the original game, after all!
If you’re still reading, you’re either interested in designing a traditional level yourself, or I’ve sold you enough on the concept that you’re intrigued (if not either of those, you’ve probably skipped to chapter 5 by now). So let’s get straight into it then - these chapters will be broken up into sections based on a tip or piece of advice that I’ve learned from others or discovered myself while making my own traditional stages in SMW. My hope is that some of these might be beneficial to you - even though everyone has a different unique artistic voice, I think these are general enough to apply to anyone without being too restrictive.
Chapter 4, Section A: Assemble your level’s Gameplay Palette
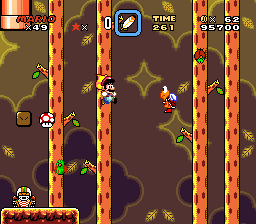
In SMW romhacking terms, a palette is the all of the different colors that make up the level’s aesthetic. So what is a “gameplay palette”? Well, it’s a term I sort of just made up, but I think it’s a good way of thinking about things. Essentially, a gameplay palette is all of the gameplay-related things that “make up” your level. Let me explain by using an example from one of my hacks (Spatial Whirl).

We can see that the level is primarily constructed of a few gameplay elements: dino rhinos, dino torches, jumping piranha plants, slopes, falling grey platforms, and brown eating blocks. These things make up the stage’s gameplay palette. Note that there are a few koopas later in the level, but extremely common enemies (like koopas, goombas, and sometimes chucks) can often be thought of as separate from the gameplay palette.
If this sounds like some made-up romhacking nonsense, it’s not - in fact, nearly every Mario game ever created by Nintendo does this. Though there are a few weird exceptions in the original game, like the bizarre Chocolate Island 5, most of the original SMW levels stick to a few select gameplay elements, which are reiterated upon throughout the stage. We can even perform this exercise with a few of the original SMW levels to prove that this is a real thing.
Why does this matter? Well, there’s two reasons, but we’ll discuss reason one first. This is a really important tenant of traditional design that we’ll touch on in detail in a later topic: the uniqueness of stage themes and avoidance of theme repetition. Notice how, in Vanilla Dome 3 above, Nintendo didn’t use every single cave enemy under the sun? There are many more cave enemies that fit within that tileset that were specifically not used. Vanilla Fortress shows even more restraint - only 4 castle enemies are used throughout the entire stage (5 if we count a few falling spikes). Could thwimps have been thrown in? Some underwater pencils? Some sparkies and hotheads? Sure, they easily could have - but Nintendo deliberately chose not to toss every single castle enemy into the level for a very good reason.
When you’re creating a hack, it’s important for stages to feel unique and distinct from each other. This may seem like a paradoxical philosophy in the realm of traditional design though - after all, we can’t just slap a reverse gravity Kaizo puzzle into a traditional hack in order to have “unique levels”. Levels need to be fairly similar in style to the original SMW. Despite each stage being traditional, however, having each stage feel unique is an incredibly important aspect of traditional design and, in my opinion, is absolutely imperative for a highly successful traditional project. So how do we make stages feel distinct from each other? The key to achieving this is to assemble unique “gameplay palettes” for each stage in your traditional hack, such that no stage feels like a retread or copy of a different one. If you were making a hack, you probably wouldn’t want there to be two separate forest levels with the exact same music, palettes, and graphics, would you? Would players really enjoy that? Well, it’s the same thing for gameplay - players will quickly notice when there’s two levels with identical or near identical gameplay palettes.
This may seem easy to achieve in a tiny hack, but the more levels you have, the more important this tenant of game design becomes. If you have 15 levels with the pokey tileset, and in every one of those levels you use every single enemy that fits that tileset, none of these 15 stages will feel unique from each other (regardless of how different the aesthetics are). In addition, special enemies (not your run of the mill koopas, but unique enemies like dino rhinos and mega moles) inherently feel more special and unique if only encountered a few times. Did you know that lava lotus only shows up in the original SMW in 3 levels? Play half of the standard hacks on SMWC and you’ll see that sprite show up in a third of the hack’s levels sometimes. Some enemies in Yoshi’s Island literally only appear in a single sublevel. Nintendo understood the importance of making gameplay elements feel special and unique. This extends beyond sprites and objects as well - overarching gameplay elements, such as unique autoscroll patterns and unique layer 2 commands, are used sparingly in the original SMW, such that each time they are used, it feels like a unique and special moment. If you do this in your traditional hack, I promise that it will have the same effect on players.
I think that a lot of people get tripped up by only thinking about how each level is unique from other levels in the hack at a surface level. For instance, a cherry blossom forest with upbeat forest music might look and feel visually unique compared to a snowcapped mountain with intense music. However, if both levels are left-to-right scrolling romps with koopas, lava lotus, and chargin' chucks, they're actually going to feel incredibly similar in terms of gameplay. This is something we want to avoid - strive to have your levels feel unique in terms of both aesthetics and gameplay.
As a quick aside - remember that romhacking gives us tools that let us go above and beyond what the original SMW did. Remapping enemy tilesets with YYCHR to create unique enemy sets, using sprite disassemblies to remap enemies with conflicting graphics, and even using DSS to tear down the barriers of sprite tilesets in general, are all powerful tools for creating a unique gameplay palette. These tools let us go beyond stuff like having every traditional sky level feature enemies from the mushroom sprite tileset. Of course, it’s fine to stick to the classics, but using these tools is a potentially very easy way of making unique gameplay palettes in each of your hack’s levels.
Now for the second reason - having a distinct gameplay palette in each level allows you to create better level motifs.
Chapter 4, Section B: Understanding Level Motifs
So you’ve decided on your stage’s gameplay palette. Let’s return to the example I shared above from Spatial Whirl:
Now what? Well, it’s time to start making the level! But there’s a few things we need to go over and better understand first - namely, the concept of level motifs. A motif is a recurring element that reappears frequently throughout a work of art. In your level, the motifs are the recurring elements and obstacles that make up your stage. But wait - recurring? Shouldn’t obstacles be unique from each other?? Well, yes, but also no.
Using motifs, in conjunction with gameplay palettes, allows us to accomplish two very important goals:
- It gives the level focus and direction, allowing stages to feel like cohesive and complete packages, rather than a sum of incoherent parts.
- By focusing on gameplay elements that are familiar, this allows the player to focus completely on learning that element and getting better at it, instead of having to re-learn new things constantly as the level continues. This also allows us to gently ramp up the difficulty throughout the stage, giving it a tangible sense of progression.
Let’s take a look at my Spatial Whirl level again:
There are a few different things that I’d call a motif that occur throughout the stage, which I can break down like this:
Motif 1 - Dodging dino rhinos and dino torches
Motif 2 - Dodging jumping piranhas in pipes
Motif 3 - Navigating terrain made up of brown blocks that get erased by the eating block sprite
Motif 4 - Platforming on slopes
And.. that’s basically it. All 22 screens of this level can ultimately be sorted into one of the above 4 motifs. These motifs make up the primary obstacles in the level and feature some sort of danger, which the player needs to overcome. So, did I sit in my chair, deeply contemplative and stroking a long white beard, pondering to myself “hmm, what ever shall my level’s motifs be?” No, not really. Coming up with motifs is a more natural process that often happens while you design the first few screens of your level naturally. What sort of obstacles look fun to you? After throwing a few screens down, did the gameplay seem compelling? Could they make up the core motifs for the entire level? (No clue how to make a good obstacle? Don’t worry - we’ll cover that in the next section). At the most basic level, traditional levels are essentially all about taking the stuff that makes up your gameplay palette, coming up with some fun obstacles (motifs) out of them, and then reiterating upon those motifs throughout the level.
I’m going to steal something that mellonpizza said to me once that I really liked - “motifs are the thing in your level that gives it identity that you resonate with”. The gameplay palette is your set of musical instruments, the paint on your wooden artist’s palette thingy. The unique things that you do with these tools in a particular level are the level motifs.
Your traditional level should have a handful of motifs - too many and the level feels like a complete hodgepodge of ideas; too few and the level risks becomes repetitive, which can sometimes be worse than your level being a hodgepodge. The key here is to make things feel natural - you want it to feel like you had a general concept for what direction you wanted the level to go, but you also don’t want your level to look rigid and formulaic, as if it was “an exercise in designing with motifs 101”. It’s better to play loose with this concept, which you’ll get a better feel for the more practice you get. A quick note: using only one single motif, or even something more wild like using one single type of enemy in an entire level, can technically work, though I wouldn’t exactly recommend it. You need to be extremely careful, as the risk of the level becoming repetitive skyrockets (the key to making it work is by carefully adjusting the complexity of subsequent obstacles, making each use of the motif feel different from the last).
Motifs should start out in a fairly basic form and increase in both difficulty and complexity as the stage goes on - out of all of the advice that you’ll read in this doc, this is probably the most obvious one - it is a concept that is regularly discussed in topics of game design. This concept is extremely important for making the level feel like there is a tangible progression in difficulty. As the player gets used to the obstacle types, or motifs, you devise earlier in the level, the motifs will increase in both difficulty and complexity, aligning with the player’s increasing experience in dealing with these motifs. (As a random aside: not every level needs to have a difficulty progression; many of the hardest levels in the community are the same difficulty throughout, but these cases tend to be relegated to extremely difficult stuff). One of the toughest aspects of traditional design is figuring out how to iterate on motifs and increase their complexity without introducing repetitive design - we’ll touch on this topic in a bit later.
We can look back at the example from Spatial Whirl and see how each of the motifs increases in complexity as the stage progresses:
Dino dodging motif
Slope motif
Brown eating block terrain motif

Jumping piranha plant motif
In addition - notice how the various motifs sort of flow into each other? These aren’t rigid obstacles that need to be separated - these motifs should intersect with each other or even happen at the same exact time (a concept called accumulation, which we’ll discuss later). Think of it like you’re dumping your level’s ingredients into a river and letting them flow naturally. Sometimes, they may be separate; other times, they may clump together - this all happens naturally based on where the current takes them. All of the eating block obstacles above also feature the dino hopping / dodging motif, and the use of slopes for platforming usually occurs concurrently alongside the other motifs, not as something totally separate. This obstacle below features the eating block terrain, dodging a jumping piranha, and dodging dinos motifs all at once:
The level can and should include breaks from the motifs: these breaks can be sections for powerups, little snippets of randomness and whimsy added just for fun, or something else entirely. Remember - game design is an art form, not a science. We’ll get more into this in a later section, but keep in mind that it’s perfectly okay to sometimes break from the concept of using established motifs just for the fun of it. This also helps with the “repetition problem”, which we’ll discuss in-depth in a later section.
Lastly, using motifs does not mean that the entire level needs to be a continuous iteration of the same motifs established at the start of the level. Vanilla Secret 2 and Chocolate Island 5 are great examples from the original game that almost feel more like silly hodgepodge levels than anything. They don’t really use motifs, though they do still follow a few established “rules”. This gives them a quirky personality and makes them unique from other levels in the game. In fact, Vanilla Secret 2 and Chocolate Island 5 contain something in common - they both rely on using stage “scenes” that completely change every few screens.
Instead of using recurring motifs, Chocolate Island 5 contains three distinct stage “scenes” that occur one after the other:
Vanilla Secret 2 actually follows a similar pattern - instead of using motifs, it contains three “scenes”. The now-famous green hopping parakoopa scene takes up almost the entire first half of the level, while the second half switches it up completely:
Indeed, most of the original SMW’s castle levels are like this as well. While fortresses tend to be structured in a traditional manner, with motifs that recur throughout both halves, the end-of-world castles all feature a first half and a second half that are completely different from each other. In fact, Ludwig’s Castle contains three distinct “scenes” that all occur one after the other. In a way, all three of these levels are quite similar to each other.
Despite the sudden switchup from scene to scene, the general gameplay still follows the same core concepts that we already discussed. Each scene contains its own distinct set of enemies, motifs, and gameplay elements - they all contain the same “gameplay palette”. In a way, you can almost think of it like these levels are made up of distinct mini-levels. Doing this can be a great way to make levels feel unique in your hack, but be careful not to overdo it. Chocolate Island 5 stands out because of how unique it is compared to the levels around it. If every single level in your hack tries to be quirky and different like Chocolate Island 5, the end result may feel like a bunch of hodgepodge levels full of incoherent ideas.
Chapter 4, Section C: Exploring the Types of Challenge / Danger
The concepts we discussed above are really useful at a more holistic level - these tips greatly help with making your levels feel unique from each other, as well creating a sense of progression within levels. What about the obstacles themselves though? The idea of motifs are fine and all, but if the obstacles themselves are uninteresting, that’s an entirely separate issue. However, if we can better understand what makes an obstacle challenging, we may be able to better understand how to make fun obstacles.
Platforming games are fun because there’s some sort of challenge that the player has to overcome. Without challenge, there is no gameplay and the game ceases to be a platforming game. Now, because someone will get upset over that sentence, please read this - this does not mean that a video game isn’t fun unless you’re dying constantly. A challenge is simply when you need to use either your brain and/or fingers to make gameplay decisions - you might be able to beat every single level in the original SMW without dying once, but you’re still being “challenged” in some way.
A quick note: there is no requirement that 2d sidescrolling games have any amount of challenge. Perhaps you’re more interested in creating an aesthetic experience where you take in the visuals, a story-based experience where platforming is secondary, or even a horror game where the experience is focused entirely on building an atmosphere of terror. Nevertheless, the focus of this section is on traditional platforming hacks, and those need platforming based challenges in some shape or form.
There’s an SMW Reverse Design Guide Book that lolyoshi showed me a while ago that attempts to reverse-engineer the original SMW’s level design. While a lot of stuff in it is superfluous to romhacking, and it gets a bit too deep into abstract theory for our purposes, I do really like the section on what the author calls “skill themes”. I’ve borrowed this concept from the reverse design SMW book, tweaking the names slightly and adding a couple of my own categories. Despite the fact that such a list will never truly be inclusive, I feel like this represents a good summary of the different types of “challenge” that you can encounter playing traditional SMW levels:
Planning and Executing:
On-The-Fly Parsing:
Misc:
Being able to create interesting challenges out of the above types of danger is a really important part of making a platformer - as part of this process, you need to create interesting sprites and objects for your game. The good news is that Nintendo did all of the hard work for us already - all of the stuff that already exists in SMW was made to challenge players in all sorts of different and interesting ways. Now obviously, Nintendo didn’t go about thinking to themselves “hmm, now how do I make a sprite that uses the concept of moving targets?”. No, they just made enemies and platforms and stuff, and when something felt good, they rolled with it. However, just as an example, pretty much all of the enemies Nintendo made can be placed into either Enemy Intercepts or Periodic Enemies. I think this is worth studying, just to get a feel for the different ways that you can craft obstacles and create danger in your traditional level.
A lot of the enemies and platforms in SMW are evolutions of concepts introduced as early as SMB1. A simple horizontal/vertical moving platform is a staple of platformers across the genre - it’s the easiest way to create a platforming challenge, after all. The simple moving platform in SMB1 evolved into many more moving platform sprites in SMB3, which further evolved into the slew of platform sprites we now have in SMW.
Moving Targets Platforming
At its most basic level, a moving target challenge is when Mario needs to jump from point A to point B, and either point A is in motion, point B is in motion, or both are. This is a simple challenge in practice - it tests the player’s dexterity from a core platforming perspective. Note that moving targets platforming typically allows you to wait and plan out your next move, though not always. In this sense, this skill tests the player’s ability to plan how to tackle an obstacle, and then subsequently execute said plan (thanks to mellonpizza for articulating this idea better than I ever could have).
When isolated, this challenge can be slightly basic. The key is to increase complexity, either through platforms that move in tricky patterns (the first gif), or by combining this challenge type with other types of challenges (as seen in all three gifs below). The chucks in the middle gif and the piranhas in the third gif add an extra element of complexity, while the autoscroll in the first gif adds pressure to perform moving platform jumps under pressure. These tasks compliment each other well - in the third gif, perhaps dodging the piranhas would have been too simple on safe ground, or jumping from trouter to trouter would have been too simple without piranhas to add pressure. The combination of the challenge types together, however, allows for additional complexity to emerge.
Periodic Enemies / Timing Obstacles:
Periodic enemies and timing-based challenges are, in my opinion, fairly similar to moving targets platforming. You need to get from point A to point B, but there are hazards in the way. These hazards move in predictable patterns - this may be a simple horizontal or vertical moving enemy, a line guided sprite, a piranha coming out of a pipe, a sprite like fuzzy that loops around blocks, or a rotating sprite, like a ball ‘n’ chain. At the most basic level, koopas and goombas that walk along the ground are periodic enemies, moving left to right on a set area (such as a ledge). These challenges typically allow you to observe what you need to perform without being placed in immediate danger. In this sense, similar to moving targets, this type of challenge tests the player’s ability to plan and execute. That said, increasing the complexity of timing based challenges and adding multiple different periodic enemies together can put pressure on the player to react quickly, as seen in the middle and right gifs below.
Be careful when using this type of challenge in isolation - if the only decision the player is ever making in your level is when to go, not how to go, you run the risk of obstacles becoming overly simple and uninteresting. Timing should not be the only decision that players have to make while playing your level. Combat this by putting the player in situations that require careful or complex decision making; alternatively, simply put pressure on the player by making them decide when to go quickly, rather than giving them all the time in the world to decide. Lastly, if you really don’t want to put pressure on the player, you can increase the complexity of a timing obstacle simply by making the required movement tricky in and of itself. Since periodic enemy obstacles are very common in traditional hacks on SMWC, we’ll discuss this more in-depth in a later section.


Enemy Intercepts:
An enemy intercept is when you need to get from point A to point B, but a hazard is in the way and the hazard forces you to react because it’s coming at you. This type of challenge is inherently different from moving targets or periodic enemies - rather than letting players plan out and execute a strategy, this tests a player’s ability to read and parse things on the fly, correct course, and avoid dying. This can be a very powerful dexterity test, but this type of challenge is far more than just how good your reflexes are. Enemy intercepts force players to use their brain as well - as danger is noticed, you need to parse what is happening on screen and decide what the best course of action is (using your past experience with this enemy or with platformers in general), all within a time constraint.
While the gifs below show extreme examples of enemy intercepts, even more subtle stuff counts as well. All of the below types of enemies count as enemy intercepts in some way, forcing you to react and make decisions on the fly:
- Homing / tracking enemies, such as rip van fish, phanto, and boos
- Horizontal / linear hazards that surprise the player, such as a kicked koopa shell
- Swooping and descending sprites, such as swoopers, superkoopas, etc.
- Overhead danger, such as lakitu or hammers from an amazing flying hammer brother
Be careful - when using this type of challenge, you need to make sure that the player has some time to react. Even if you’re able to react to it, giving the player a microsecond to react is not enough and will likely result in everyone taking damage to that obstacle. Remember that you need to approach things from the perspective of a player who has no idea that the hazard is there waiting to ambush them.
Also, keep in mind that enemy intercepts are about more than just having a sprite ambush the player. This challenge type is all about creating situations where you need to react to an approaching enemy in some way. Unlike periodic enemies, which allow you to time your plan out your next move in advance (since these enemies move in predictable patterns), the unpredictable nature of enemy intercepts requires in-the-moment reaction. This doesn't always have to equate to quick reaction - for instance, filling a water level with rip van fish puts pressure on the player through the use of enemy intercepts, even though rip van fish can hardly be considered "ambush" enemies. The key here is that rip van fish don't move in predictable patterns, instead reacting to your movement. This unpredictability causes them to get in your way, becoming an enemy intercepts hazard.
Momentum Platforming:
Momentum platforming is a simple type of challenge - you need to get from point A to point B, but point A is not a safe place to stay. This type of challenge is like a mix between moving targets and enemy intercepts: the primary skill being tested here is your jumping and platforming abilities (similar to moving targets), but like enemy intercepts, you need to make platforming decisions on the fly while under pressure. Additionally, while enemy intercepts may completely halt your momentum (as you dodge an incoming hazard), momentum platforming typically sees the player press forward constantly.
The key with momentum platforming is to combine it with other challenge types to create situations where the player needs to perform careful platforming maneuvers under pressure. Just like with enemy intercepts, this type of challenge tests a player’s ability to read and parse things on the fly, correct course, and avoid dying. This time, however, instead of testing your ability to parse enemies and hazards, your reflexes are primarily related to controlling Mario and getting him to where he needs to be safely. In this sense, this type of challenge is far more focused on platforming than enemy dodging. As seen in the below gifs, however, momentum platforming works at its best when combined with other types of challenges.
Interestingly, the reverse design book includes ice physics as a momentum platforming challenge as well. Thinking about this, I can see why - ice physics tests your platforming abilities, but the slightly chaotic and tricky nature of controlling mario on ice results in you needing to carefully control Mario's momentum. I'd also include fast autoscroll speeds, as well as levels with short time limits, in the category of momentum platforming. The key here is that the level puts pressure on the player to press forward constantly while under pressure.
In the below gifs, notice how momentum platforming is combined with another challenge type? In the first gif, it's combined with enemy intercepts, while the second and third use periodic enemies. Combining challenge types is extremely common and something we'll discuss in-depth later.
Exploration:
Required exploration may not seem like a type of challenge, but in my opinion, it counts as one. I think that the developers of the original SMW would probably see it as one too, given so many of the original SMW levels focused on this theme. It is a test of your spatial awareness - where have you been before, where have you not been yet, and what is your ultimate goal for where you need to be. It can also test your endurance - as exploring can take as long as you, the player, needs to take, simple periodic enemy challenges can become more intense, as extra pressure is added from you not wanting to die and having all the time you spent exploring go to waste.
Be careful with exploration. If you’ve used SMWC at all in the past 18 or so years, you’ve heard this old adage uttered 1000 different times - “item babysitting is bad”. Well, I’m here to report that, for the most part, it’s still bad for all of the reasons you’ve already heard. Exploration should be combined with other fun challenges and should be seen as a complete realization of prioritizing player freedom over level author control - not as a chore. Add fun little secrets and stuff that entices players to explore. Make areas inherently fun to explore due to the other challenges already included within them.
In my personal opinion, the key to good exploration levels is whimsy. Stuff like Star World 1 and Star World 3 in the original SMW work because of how silly and amusing they are to explore. Exploring boring and uninteresting environments isn’t inherently fun. Essentially, more than any other challenge type listed here, it’s all about the vibe.
Now, there exists an issue with exploration that I won’t even attempt to solve here. Some people prefer when exploration is required, finding that optional exploration without proper incentives to be meaningless. On the flipside, other people will tell you that they despise required exploration, but love it when it’s an optional thing that you can do out of your own desire to do so. So who is right? Both really. I think whichever way you take your exploration level, whether the exploration is required for a secret exit, somewhat-required for dragon coins / moons, or completely optional for the fun of it, just do whatever you feel is right and don't overthink it.
Object Permanence Tests:
Object permanence tests are a more unusual and uncommon type of challenge. Nevertheless, as they are completely distinct from the above challenges, I think they are worth their own section. The essence of an object permanence test challenge is internalizing where things are in the game, even if you can’t see them. This isn’t strictly a memorization test - rather, with this challenge, you often need to internalize where things are quickly while under pressure.
However, there may be situations where you can observe danger ahead of time, as seen in the third gif. While your first reaction may be to assume that this type of challenge only tests your memory, I would argue that it’s more so related to spatial awareness and how well you can unconsciously internalize the architecture and enemies present in the stage. This type of challenge can be very tricky, as it asks the player to have good reflexes and perform dexterous tasks, while also using your brain to process your spatial awareness, often at the same time.
Endurance / Gauntlet Challenges:
Gauntlets are levels that take a really long time - long enough that you start wondering to yourself “wow.. is this level like, gonna end or what?”. The point of gauntlet levels is not to make you irrationally angry because it’s funny, but to accomplish two very important things - test endurance and build pressure.
Ultimately, a gauntlet challenge is not technically a type of unique challenge - it’s actually composed of all of the other types of challenges that we’ve listed here already. The difference, however, is the new form that these challenges take. The longer you go without dying in a level, the more that the pressure to not die grows. In other words, the possibility of dying becomes more and more devastating the longer you go between two checkpoints or savepoints. This causes simple periodic enemy challenges deep into the level to take on a new menacing form. Simple mistakes in other levels become grave mistakes in gauntlets. This buildup of pressure specifically tests your ability to perform under pressure and to stay consistent despite your nerves, which makes it unique from other types of levels and worth mentioning here.
I’m not going to try to sell you on the concept of gauntlets if you hate them - after all, it’s a controversial type of challenge. That said, hopefully you’re able to better understand the appeal for those that enjoy them. The feeling of immense pressure to not fail can be a thrill - sort of like getting deep into a speedrun, knowing that one mistake can ruin your last hour of work. People that enjoy gauntlets aren’t masochists - they just genuinely enjoy that feeling of trying to perform under that immense pressure.
Oh and, as shown by the first two gifs below, gauntlets tend to be pretty hard… cause nothing goes quite as well together as long and difficult, after all. That said, building up immense pressure through extremely long sections does not require high difficulty - the third gif below shows an incredibly long stage with only moderate difficulty. Despite the lower difficulty, the mounting pressure still makes each decision you make feel incredibly critical.
Enemy Combat:
This challenge is, in theory, similar to the periodic enemy challenge type in that you need to get from point A to point B and there is some sort of enemy hazard in your way. The primary difference here, however, is that these enemies are extremely unpredictable and force you to either parse things on the fly (similar to the enemy intercepts challenge) or perform some kind of combat maneuver to destroy the enemy to proceed. Enemies that make heavy use of projectiles, RNG, or unpredictable patterns, along with bosses of a similar nature, would all fall under this category. Often, large amounts of enemies or projectiles are used to create tense situations that necessitate the use of “combat” to not die.
This type of challenge isn’t seen often in SMW hacks - primarily because SMW is a platforming game at heart. Some of the tougher enemies, such as hammer bros, can count as action-oriented enemies. Despite having a pattern that is somewhat predictable, anyone can tell you that getting past a tough hammer bro is more than just a timing exercise. Since this sort of challenge combines aspects of both periodic enemies and enemy intercepts, I think it’s fair to consider it its own sort of unique challenge. Unlike the enemy intercepts challenge, however, with these challenges, you often have ample time to prepare and develop a plan that you need to execute.
SMW hacks that require Mario to perform some sort of combat against enemies are rare - mainly because Mario’s combat tools aren’t super well developed. Ultimately, SMW is a platforming game, after all - it’s not Metal Slug. That said, ASM allows us to push the boundaries of what SMW can be to the limits (as seen in the second gif below), and I don’t doubt that we’ll see more of this sort of design in the future. Even without ASM, we can certainly still make use of the flower and cape to some degree.
The first gif below (featuring an SMW level inspired by Doom’s genre of slaughter levels, which focuses on dealing with an onslaught of hordes of enemies) shows how the cape can be a valuable asset towards gameplay that contains far more combat than it does platforming. Conversely, the third gif shows how using ASM to add tools to Mario’s "arsenal" of combat options can enhance combat-based gameplay. Cape can be tricky to use as a short range weapon, while fire flower isn’t quite powerful enough to function as a good weapon against stronger enemies. Using ASM to give Mario additional combat-based tools, or ASM to make regular enemies stronger (as seen in the second gif) is probably the most likely path forward in the SMW scene when it comes to this sort of gameplay.
There is technically one final way to add challenge to a traditional platformer that we haven’t discussed yet - using your brain to solve something (yes, you can include the occasional puzzle in a traditional hack and still have it feel traditional!). However, since this is so closely intertwined with creative design, we’ll discuss this extensively in chapter 5.
Accumulation: Combining Challenge Types:
The reverse design guide book describes the process of combining challenge types as “accumulation”. From the book directly: “the most technical definition of an accumulation gives us a challenge in which two elements of a skill theme are overlaid to create enhanced difficulty”. While the concept of accumulation only really saw heavy use in the lategame and special world of the original SMW, accumulation is a core tenant of the romhacking scene in virtually any hack that tries to be more difficult than the original game.
Rarely are the above challenge types seen in isolation, if ever. In fact, finding gifs of the above levels to describe each challenge type was somewhat difficult, as most SMW hacks contain levels that combine all of the challenge types in various ways. Take the gif below, which shows how periodic enemies (piranhas, vertically jumping fish, koopas, and goombas) can be used in conjunction with hopping fish, which function as enemy intercepts. You’re being asked to time your next jump without any pressure one second, before being immediately asked to perform a quick reflex the next.
So these challenge types - are these concepts that level authors are actually actively thinking about as they design levels? Well, not actively, usually. For the most part, the information above becomes internalized as your experience with designing traditional levels increases. Let’s return to my example Spatial Whirl level:
Let’s go through what I was thinking in my head as I started working on this stage. First - the gameplay palette. I knew that I hadn’t used dino rhinos much in the hack so far, so I decided to use them here. I hadn’t used eating blocks at all either, so these were in the back of my mind. I knew that dinos, which are technically enemy intercepts, become much more interesting when combined with uneven terrain (as they hop every time they approach a solid block). Before I even started the level, I realized that eating block terrain and dinos could be interesting to combine, as the brown block terrain could create uneven objects that allow for the dinos to hop more often.
From there, I started to come up with level motifs. The first would be obvious - dodging dinos. As I described above, this motif is primarily an enemy intercept challenge, though it’s not a particularly tough one, as the dinos are slow enough that you usually have a fair bit of time to react. In addition, the eating brown blocks add momentum platforming challenge - as the ground underneath you is no longer safe from the eating block, you’re forced to press forward and dodge dinos under pressure. Lastly, the slope and piranha motifs were added to give extra spice to the level, as every single setup being made up of brown block terrain may have introduced repetitive design. While the piranhas obstacles are examples of periodic enemies, the grey platforms that immediately precede them (momentum challenge) force you to make a decision on when to dodge the piranhas while under pressure.
Did I sit there thinking “hmm, now how can I add an enemy intercept and a momentum platforming challenge to my level?” No, obviously not - even I’m not that pretentious. But nevertheless, these thoughts and concepts had already become internalized in my brain somewhere down the road from my past experience with making traditional levels. I knew how to use dinos in a way that makes dodging them more challenging, and I wanted the player to have to dodge the dinos while having a moderate feeling of pressure.
In summary, challenge types, motifs, and gameplay palettes are all things that are key components of a level - they all exist under the hood. As you gain more and more practice with the above concepts, all of this stuff becomes second nature and you won’t have to consciously think about any of it. Your priority will become creating interesting obstacles, and those obstacles will tend to fall into one of the above categories, if not multiple at once. That being said, if you’re still getting your feet wet with traditional design, I personally think it would be helpful to give some conscious thought to gameplay palettes, level motifs, and challenge types while creating your level.
Chapter 4, Section D: Sprites Are Hazards, not Decor
We've all heard it before: "never design your levels by putting the foreground tiles down first and then the sprites"... but like, why? We all know this is a rule that is often repeated in romhacking and SMW circles. It's rarely explained exactly why this is bad practice, however. In order for us to write it off as true bad level design practice, we need to better understand why it's considered so bad.
The key thing we need to understand is that, when you design an obstacle (perhaps with one of the above challenge types in mind), you need to actively think about how the obstacle is creating challenge for the player. The enemies in your level need to, in some way, shape, or form, get "in the way" of the player - such that you need to make a gameplay decision on how to not take damage to them. When you design by placing the foreground down first, unless you've planned out exactly what each obstacle will be in your brain (which would be impressive), it's likely that you're still considering enemies to be an additional part of the stage decor. If you're placing enemies down in the same way that you would place down bush decor, or add trees to a tree canopy, you aren't actively thinking about how the enemy can function as a hazard.
Let's look at an example. I made this little test section in about 5 minutes to demonstrate this concept. Looks decent, right? Maybe alright for a 1-1?
Well, let's give it a test and see:
Notice how we can kind of avoid like half the obstacles? None of the periodic enemy challenges we created with the red koopas are ever actually in the way of the player. The rexes do get in the way, though momentum is kinda awkwardly halted twice as a result of slightly haphazard rex placement. If we think about what we've learned so far, we know that, in order to create challenge in a level, we need to make the player execute gameplay decisions (often, but not always, while under pressure). Ultimately, none of the material in the level presents an actual challenge type - all the enemies were placed as if they were just additional decor meant to make the level "look" like a Mario level. However, we now have a challenge - this is stage 1 of our easy traditional SMW hack. How do we add real actual challenge types without making this way too hard for a 1-1?
Let's start by dealing with the situation around this first ledge. First off, there's zero incentive to make the player go up there to begin with. I've added a DC as a sort of optional challenge - after all, this is 1-1 of an easy hack. It might be nice to gently introduce the stage's gameplay palette (rex, ledges, winged ? blocks, and red koopas) and associated stage motifs through an optional challenge. I also added pipes to partially block off the ? blocks and prevent you from skipping an interaction with the koopas. While it's not always good practice to do this (we'll get into why player freedom is important in traditional levels), I think it's fair to do here, considering taking the ? block route is both easier and more obvious than the route with the actual periodic enemies challenge. However, I still made it slightly possible to squeeze into the ledge; now there's a tradeoff - take the red koopa route, or do an ever so slightly awkward jump off the ? blocks, which requires being able to control Mario's jump arc. Regardless, even if you jump from the ? blocks, you still need to dodge the red koopa (periodic enemy challenge) to grab the DC.

We can also use these ledges to our advantage - red koopas are fairly easy to deal with from above, since you can simply jump on them. From below, however, they become a more deadly hazard. Players need to time their jump through the ledge safely; you can't simply romp your way through the obstacle mindlessly. Note that this obstacle is purely a periodic enemy challenge with zero pressure or additional challenge types (accumulation) added - the result is an obstacle that is fairly simple and even slightly dull. However, since this is just the start of the level, and it is 1-1, this is totally fine for now. We'll iterate further upon this motif when we get deeper into the stage, adding additional complexity to the motif and accumulation of challenge types.
For the next "obstacle", I've forced the player to jump through a ledge while dodging a red koopa. This obstacle is very easy - it's almost a challenge to get hit. Nevertheless, it's the very first obstacle in the game (and we already decided this would be an easy hack), so it's mostly fine. The key thing here is that you still have to interact with this enemy in some way and make a gameplay decision. You can also jump over the ledge from the left, though that requires you to have dodged the left red koopa instead. The point is that, to progress beyond this screen, you have to engage in some way with the level's initial motif.
Next, we introduce the rest of the level's "gameplay palette" - rexes and winged ? blocks. The rex is introduced very casually here, as the most simple form of the motif possible - a single rex on flat ground. Above the ground is a hazard that is quite a bit more advanced than the prior hazards - a 1up resting on a ledge with a patrolling red koopa. Although this is another completely static periodic enemy challenge, it's slightly tricky to time due to the placement of the ledge. You can't simply jump on the koopa; you'll need to time the jump in some way, which can (precisely) be done off the winged ? block, or the ledge to the right. Since the obstacle is pretty tough, I've made it fully optional. However, for slightly more experienced players playing this 1-1, doing this sort of thing can add some extra spice to an otherwise simple few screens. As an aside, you can also grab a shell from an earlier koopa and throw it upwards to kill the red patrolling koopa here - a fun little use of player freedom.
We have slightly more complex versions of the central motif here - red koopas guarding a pipe that will lead to a little bonus area, as well as another (now smaller) ledge with a red koopa). Again, these are all extremely basic periodic enemy challenges, but they still force you to engage with them - the key is that we're thinking about enemies as if they are hazards (which they are), not decor.
Things get a bit more complex here. There is a DC guarded by another red koopa on a ledge - the stage's central motif. Here, however, accumulation is introduced for the first time. The motifs are combined (winged ? block and red koopa), and the periodic enemy challenge is combined with a moving target (moving winged ? block), although jumping from below to activate and halt the ? block negates the moving targets aspect. Two rexes are used here - a very subtle increase in complexity for the rex motif. The final part of the screen is another instance where the motifs are interwoven - notice how we can either interact with the rex or with the red koopa. Regardless, to progress, we must dodge the enemies in some way.
Let's see it all in action now. As we can see, this level is much more confident in its level design than my first attempt. Pay attention to how we need to actually engage with all of the enemies and hazards throughout the stage, which was not the case in the first version of the level. They don't exist simply to make the level look like an SMW level should - they actually serve a purpose, to be dodged as a challenge.

By now, you should have a very strong understanding of why building the foreground first can be tricky. While it is technically possible to make a decent level by designing the foregroud first and then adding sprites overtop of it, I absolutely do not recommend it. The vast majority of experienced designers don't design this way. Rather, when you think about your enemies as hazards, you'll naturally want to design each screen and obstacle at a time. The end result will be a level where it feels the player must actually engage with the contents of the level.
Additionally, notice how the enemies all get in the way, but not to the detriment of the level's flow? You should always make sure that the player can't negate the obstacle's challenge by just standing there and waiting. For instance, the below obstacle is not great - players will stand there and wait for the buzzy beetle to get out of the way before progressing. This isn't a periodic enemy challenge or an enemy intercept, it's just required waiting. It would probably do you well to strive to avoid these types of obstacles. Making the player engage with your obstacle means making sure that they can't simply stand there and wait for the danger to completely go away.
Ultimately, this example level we created together is a rather easy level devoid of significant challenge. However, that was also partially my point - I want to demonstrate that using enemies as hazards is not a practice relegated to the realm of very hard hacks. Every traditional stage should treat its enemies as hazards, no matter how easy the hack is. The original SMW does this, after all, and most would agree that the original game isn't terribly hard.
Chapter 4, Section E: Various Tips and Advice
By now, my hope is that you have a much stronger understanding for crafting traditional levels in general. However, there's stil a few miscellaneous tips and advice that I want to share. Consider this a lightning round - we'll spend less time covering each topic, but they're all pretty important!
Avoiding Design Repitition:
Take a look at this level:
Now, look at this one:
It's subtle, but do you notice how the second level features a slightly stronger variety in the motifs used? The first level, while not outright bad by any means, suffers from a slight repetition problem. A lot of the obstacles are rather similar to each other in structure, as well as the type of challenge being used. It's very easy to accidentally introduce repetition as you get more into traditional design - the first gif shows a level I made in 2023, while the second was made in 2024 (after I had a better grasp on how to avoid repetition). The problem is as such: in a traditional level, you want to iterate upon established motifs and a few key gameplay elements (the gameplay palette). How, then, do you do this without making all of the obstacles seem too similar to each other, like in the first level?
There's a few key things I would recommend when trying to avoid design repetition. First, I would suggest having a decent number of things that make up your gameplay palette. If the only sprites in your 16 screen level are sparky and chargin chuck, it's going to be that much more difficult to think of distinct motifs. However, if you are using sparky, chuck, thwimp, and note blocks, now you've got a lot more material to play with. Be careful not to overdo it, however; if you use 15 different enemies and the enemies you use change every screen, the result is going to feel like an incohesive hodgepodge.
Second - when you decide upon your level motifs, come up with a few motifs that are somewhat unique from each other. If we look at the above levels, the pink castle really only has 1 central motif - line guided grinders moving in square shapes combined with ground grinders. Pencils introduce the occasional periodic obstacle, which temporarily blocks your path and makes you have to dodge the grinders while under pressure. This is decent and it can be fun, but some players may notice that the obstacles start to blend together, especially if the level is long. The first level also features only one challenge type throughout the entire stage - periodic enemies. The second level, however, has a few very distinct motifs. There's line guided grinders moving in square shapes, just like the first level. However, we also have a new motif - line guided brown platforms that fall down when you step on them. This introduces a second motif that can be combined and intertwined with the first in interesting ways. Additionally, the brown platforms challenge the player in a completely different way - if we think about it, isn't it kind of a momentum platforming challenge? It puts pressure on the player to move quickly, so you can't sit there with all the time in the world while you jump through the grinders. And this all goes back to adding pressure on the player to create challenge... see, it all comes together in the end! (Okay technically, the first level also puts pressure on the player by making the ground almost always dangerous with grinders, but the way it does so is slightly repetitive).
Lastly, make sure that you properly increase the complexity of the motifs as the level continues. The pink castle level above iterates upon each motif and increases complexity very very slowly. In fact, you can barely tell how each obstacle is harder or more complex than the last few (and in some cases, they might not be at all). In the second level, however, we can clearly see the motifs increase in complexity. The brown falling platform motif shows up three times in the gif, and each time it appears, the obstacle is quite a bit tougher than the last time it showed up.
Here's a good litmus test to see if your level suffers from repetition - send your tester some screenshot of your level after they tested it and ask if they can remember where those setups were in the level, or if they can remember them at all. If your tester doesn't have a clue, it's likely that your level has a slight repetition problem where the obstacles are all blending into each other (or your tester is fundamentally incurious, but that's another problem).
Be Careful Not to Overrely on Periodic Enemies - Or, How I Learned To Stop Worrying And Love The Jank:
Ever since JUMP 1/2 came out, this seems to be a recurring problem in traditional levels all across the community. We've all seen it before - levels where every obstacle involves enemies stuck in those JUMP 1/2 sprite-only blocks. The obstacles tend to be super linear, where you need to time getting past a sprite as it travels in a predictable pattern. If you don't know what I'm talking about, I've included a (slightly exaggerated) example below that I created:

So what's the issue with these obstacles? Well, you might say that it's the sprite-only blocks and their overuse. While that is a slight problem, I would say that the larger issue is that all of these obstacles are extremely basic periodic enemy challenges with extremely little decision making involved. Not once is the player under any pressure whatsoever. Instead, as you encounter each challenge, the only decision you have to make is when you have to go. This is a fairly simple decision and, while it can be fun for a while, it isn't very deeply complelling for most players.
I think a lot of people design this way because they want to have complete control of where enemies move - it's a way to contain them and put them into predictable little boxes. I think that for some designers, it's a way to remove the natural "jank" of SMW. However, this "jank" is, in my humble opinion, what makes much of the game interesting in the first place - Nintendo added slightly unpredictable sprites like boos, chucks, lakitu, or rip van fish on purpose. These enemies create enemy intercept challenges and put pressure on the player. This pressure encourages complex gameplay decision making, which is ultimately more fulfilling and rewarding for many players. If the only decision your player is ever making is when to time each obstacle and perform a simple run or jump, you aren't testing any of their other skills - skills that are fun to get good at and execute.
In summary - periodic enemy challenges are perfectly fine in moderation, but be careful to not overuse them. Try to combine them with other enemies and don't be afraid to use enemies that behave in slightly unpredictable ways. This slight unpredictability isn't going to screw over your level's players - in fact, it's going to make things interesting and make it feel like their skills are being tested.
As a side note, I find it amusing how popular this type of design became after JUMP 1/2 came out, despite the fact that very little of JUMP 1/2 is actually designed this way. While there are tons of sprite-only blocks across the hack, and there can certainly be a valid argument that they were overused in that hack, they are often used with the goal of making creative obstacles. The blocks aren't used to contain sprites into little chambers, but to allow for creative setups. However, keep in mind that, even in the realm of traditional design, overusing sprite-only and mario-only blocks has its dangers (a topic we'll discuss again in chapter 5).
Don't Reward Slow Gameplay:
Lazy once famously said that the boo ring was the only bad enemy that Nintendo ever created for SMW. Honestly, I think he's kinda right.
Let's define exactly what we mean by slow gameplay, or waiting. When we say that waiting is bad, it doesn't mean that it's bad to let the player wait. By all means, having spaces where the player can stop and rest is a wonderful, almost critical thing in traditional levels. That's not what this is about at all. Rather, waiting becomes a problem in two situations. First, when waiting is required to progress, and second, when waiting is the optimal path forward.
The first one is a lot more obvious, so let's tackle that first. Required waiting is when the player doesn't have a choice except to sit and wait. The most infamous example of this, of course, is the boo rings. These are technically periodic enemies, but the amount of time it takes to wait for the optimal pattern is substantially longer than all of the other periodic enemies in the game. Look, I'm a Nintendo apologist - I think Tubular is wonderful, I think Star World 3 is hilarious; I even like the Lost Levels. I don't think I can come up with a good reason for boo rings existing though, it's just forced waiting for no reason. I don't think I have to explain why sitting there and waiting isn't fun. It's just not. Instead of waiting, you could be reading a book, learning a foreign language, cultivating your garden, or a number of other more worthwhile things.
The second scenario is more subtle, but just as bad. When you're presented with two choices - to wait or to go, and the waiting option is vastly superior, it's just as bad as forcing the player to wait. I've whipped up a quick example level to show just how detrimental this can be for the stage's flow and design in general. The below example is obviously slightly exaggerated to make a point, but notice how the optimal strategy to deal with each challenge is to sit and wait? While you can technically go quickly, it just makes every single obstacle significantly harder. This is probably stating the obvious, but this isn't great design.

As a little challenge, and taking what we've learned already about traditional levels (remembering that enemies are hazards, not decor), let's try to fix the level up.
In this new level, you're actually forced to engage with each of the stage's obstacles. There's still ample time to react - it's not an exercise in ambushing the player. However, each challenge type is actually enforced. You don't have to rush things, and there's plenty of room to sit around and wait if you'd like. The difference here is that there's never a single moment in the level where you're better off waiting and doing nothing. There's nothing strictly pressuring you to move forward (i.e. momentum platforming challenges),
The Importance of Stage Layout:
test
Keep Player Freedom in Mind:
test
Don't Forget The Whimsy:
test
Don't Forget The Gimmicks:
test
Level Length Isn't as Important as You Think It Is:
test
Understand The Rules, Then Break Them:
test
test
test
test
test
test
test
test
test
test
test
test
Chapter 5 - Creative Design
Temporibus maxime quae ut ut tempore nisi accusantium. Quasi minus hic ut culpa. Atque ratione libero officia magnam sapiente aliquid. Est saepe odit aspernatur quas voluptatem rem. Non ea tempore deserunt laudantium vero accusantium qui. Fugit similique fugit soluta est temporibus.
Molestiae animi est cum dolores rerum voluptatem quos. Blanditiis neque necessitatibus nisi nulla amet nemo velit aut. Fugiat rerum veritatis est atque. Facilis corporis quibusdam qui reiciendis officiis. Aut eos molestias odit iste exercitationem non.
Chapter 6 - Gimmicks
Temporibus maxime quae ut ut tempore nisi accusantium. Quasi minus hic ut culpa. Atque ratione libero officia magnam sapiente aliquid. Est saepe odit aspernatur quas voluptatem rem. Non ea tempore deserunt laudantium vero accusantium qui. Fugit similique fugit soluta est temporibus.